Wednesday, December 30, 2009

It's a Dog Eat Cookie World


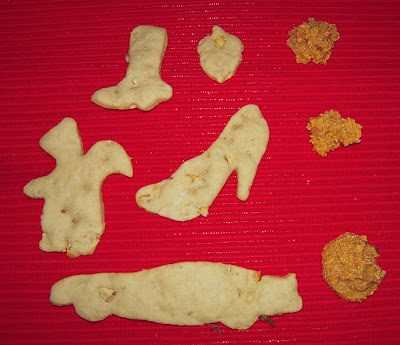
I'm two months into my culinary training now, so what is the first thing I bake at home since I've started school? Dog treats. Yep, canine cuisine. This was inspired by the big number on the price tag for healthy dog treats at the store. It's very easy to make a big batch at home for much less and your dog will love them just as much. Both recipes were approved by our greyhound Lina.

We made two kinds of treats. The first one is called Peanut Butter Puppy Poppers. These are the shaped cookies on the left side of the picture. I liked these best because they use just four ingredients (all of which you should have in your kitchen) and the dough is a good consistency for fun cookie-cutter shapes inspired by your dog's interests such as acorns, squirrels, shoes and fast cars (that one was more for Ryan actually). Here is the recipe:

Peanut Butter Puppy Poppers (from Bullwrinkle.com)
Ingredients
2 cups whole-wheat flour (we used all-purpose flour instead)
1 tbsp baking powder (we cut it to a half tbsp)
1 cup peanut butter (chunky or smooth)
1 cup milk

Directions:
Preheat oven to 375F. In a bowl, combine flour and baking powder. In another bowl, mix peanut butter and milk, then add to dry ingredients and mix well. Place dough on a lightly floured surface and knead. Roll dough to 1/4 inch thickness and cut out shapes. Bake for 20 minutes (ours took MUCH less time so keep an eye on them to prevent burning) on a greased baking sheet or parchment paper-lined baking sheet until lightly brown. Cool and store in an airtight container.

Carrot and Turkey Dog Treats (from all-natural-dog-treat.com)
These are actually called "Bonnie's Homemade Dog Treats" on the web site, but that isn't very descriptive. These treats are the orange-colored round mounds on the right side of the photo above. This recipe might require a trip to the store since you probably don't have all of the ingredient in your pantry. The four ingredients are cheap and easy to find, so don't worry. This recipe makes a very wet dough, so you can't make fun shapes with it but your dog doesn't really care about that.

Ingredients:
1 cup Cream of Wheat (dry)-we did not buy the instant kind
1 cup Carnation Dry Milk (lowfat and dry)
1 small jar of carrot baby food
1 small jar of turkey dinner baby food (it has green beans, squash and barley)

Directions
Mix ingredients together. Drop onto a parchment paper lined cookie sheet in size you desire. Bake at 350F until lightly browned on edges, then cool. We baked them on two cookie sheets in dime- or nickel-sized drops.
Sunday, December 20, 2009

Last Week of Culinary School till January

More Bread
It seems like the bread portion of this class will never end! We even have two more weeks of it when we return in January. Sigh. I have to admit that I did enjoy making the braided challah bread (holla!) pictured on the left, but I'm ready to move on now.

We also made several other breads including rich, tasty brioche (the small round ones in the photo on the right) and a rolled cinnamon loaf (also pictured) which I believe was made from bruchetta dough.

We did get a little break from the breads last week. Dell was coming to CAA for a team building trip, so we made a variety of christmas treats to give as gift bags and for us to take home.


Margaret and I made two varieties of meringue: almond and peppermint. The end result should be similar those little square-shaped pastel dessert mints but shaped like a large hershey's kiss or a round mound.

However, the deck ovens below ours were too hot and caused our oven to be too hot. This caused the almond meringues to flatten out and harden to a crunchy cookie-like consistency. They looked liked cookies, tasted like cookies, so we rolled with it and made them into cookies. We melted some chocolate and dipped our "almond meringues" and added a single almond on top for a touch of elegance, then we jokingly called them "rustic" cookies. They were actually very tasty though and would go great with coffee like a biscotti.

Our second attempt at meringue was a little more successful, but the peppermint version was still slightly sabotaged by the overly hot ovens. Having learned our lesson from the first batch, we lowered the heat on our oven considerably, and eventually turned it off altogether, but it still gave our meringue a slightly toasted color when they should be bright white. However, the shape and consistency came out just fine so we just had to look past the slight toasting and enjoy the final result.

I really enjoyed making the meringue and learned a lot about the process. We had a guest chef (also named Tracey) come in to observe our class since she will begin teaching a pastry class in January. She did a fantastic job of explaining the three stages of meringue.

First you whip the egg white mixture into a soft peak, which you can tell by stopping the mixer and dipping the whip into the mix, swirl it, lift it straight up, then turn it upside down. If the mixture makes what she called a "dairy queen curl" then you have a soft peak. At this point you add in your sugar and any other flavorings — this is your last chance to add ingredients without messing up your meringue. Next you whip some more until you reach a hard peak. You can use the dip, swirl and flip method to determine what stage you are at. At a medium peak, the mix will form a little hook, not the full curl of a soft peak. You've reached a hard peak when the mix points straight up.

Once you are done whipping, you must move very quickly to set up your baking sheet and get it in the oven. The meringue gets warm pretty fast at room temperature and will lose structure, part of the reason why our almond version got flat. It's very important to have your piping bag with star tip and cookie sheet (with parchment paper glued down at the corners with a dab of the meringue mix) ready to go. To get the striped effect on your meringue, paint stripes inside your piping bag with food coloring. If it starts to fade, you can scrape out your mix and quickly repaint your stripes.

It is also important to keep your piping bag in a straight vertical to avoid lopsided meringues. This is trickier than you think, especially when the mix starts to soften and get runny. For a good, consistent result, count to four as you are piping to ensure they are the same size, then stop squeezing the bag, pull the bag straight up and maybe give it a slight swirl to break of the mix. If you mess up and your meringue drop is too small, too big, lopsided or too pointy, then just scrape it off and try again or else you might end up under- or over-cooking it or it will just look bad. Just remember to work very quickly. Once you are done, then you will put it in the oven at a very low temperature. You aren't cooking it so much as you are drying it out. They're done when they are completely dry in the middle and light as a feather.

Monday, December 14, 2009

Best Chocolate This Side of Europe...in BASTROP!


ROSCAR Bonbons and Truffles in Bastrop

After the stress of our quick breads exam, Margaret and I decided to treat ourselves by taking a trip out to Lost Pines in Bastrop to experience fresh, handmade artisan chocolate at ROSCAR (www.roscar.com). I can't even begin to describe how amazing the chocolate is, I was truly blown away. And in Bastrop of all places!?! Seriously, Godiva doesn't even compare to the obviously fresh and high-quality Belgian chocolate delicacies created by European-trained master chef Frans Hendrik. They don't use oils or extracts to capture the flavor, instead they infuse it into the chocolate.


First, let's start with the scenery. The building is an adorable log cabin surrounded by pine trees. You kind of just want to sit on the porch, nibble at your amazing chocolates and stare out at the pine trees. Lovely! Then you step inside the building and you're completely enveloped by the coziness of the country-style woodsy interior and the heavenly (but not overwhelming) scent of chocolate.

The shelves are stocked with jars of ganache, specialty teas and gift ideas. There is also a video showing Frans Hendrik hand-making the chocolates that you see displayed in the glass counter. Artisan chocolate isn't something that you can easily find in Texas, or in the U.S. for that matter.

TASTINGS & PRICES
Now that you've taken in the scenery, you're ready for the tasting room. The kind ladies at the counter are happy to give you a small taste of either truffles or bonbons to help you find something you like. Well, you'll like them all but it certainly helps narrow down your choices since they aren't cheap. However, you can purchase a box of 4 truffles and 6 bonbons for less than $20 or just buy one or two for about $2 a piece. Not bad for chocolate of this caliber. Click on the last photo for price listings.

TRUFFLES

The flavors available at ROSCAR range from classic to truly unique. You can check out their website for a list of all the available flavors. Out of the truffles, the more unique offerings included Tequila-Lime Jalapeno (pretty good and I hate jalapeno, you don't really taste it but there is a little hot sensation), Spicy Thai Peanut (just a hint of spicy)  and Champagne (one of my faves).

BONBONS
Unique chocolate bonbons included Dark Chocolate Basil (I liked the odd pairing, but Ryan didn't care much for it), Cajeta (make with goat's milk), Green Tea, Ginger, New Orleans Punch (reminded me of eggnog a little bit) and Cabernet (GREAT pairing). The last photo on the right is high-resolution, so you should be able to click on it and read the prices/chocolate descriptions.

If you are a fan of chocolate or know someone who is, you owe it to yourself or your loved ones to experience this place. I would advise calling ahead of time to make sure the tasting room will be available and to get directions.

Rough Week

I'm a little behind on the blogging once again, but this is my meager attempt to get up to speed. I've been battling a miserable head cold for most of the week (including today) so I haven't been feeling up for writing much. However, since this is the last week of class until January 4 I figured I should post a little something before the holiday break.

Man Can't Live On Bread Alone
We've been working on both quick breads and yeast breads, and let me tell you, I don't think breads are my forte. Last week, we were tested on our bread-making skills and were given the task of individually making an apple spice bread and scones. We've been working in teams for everything (and will be throughout the course for the most part), so the exam was the first time we've flown solo. Plus, we could only bring the list of ingredients, meaning we had to memorize the procedure.

Needless to say, this didn't go well for a lot of people — myself included. My spice bread was way too salty because I think my pinch of salt must have been too pinchy. That's really frustrating since my team had experience with the spice bread already so it should have come out fine. Grrr. My scones weren't great but they were at least edible. My team, and I think one other team, were never assigned scones during class (we got spice bread and crêpes), so we were kind of flying blind on that one. If you've never seen it made, it's hard to know that the scone dough is supposed to be super sticky, that it's best to mix it with your hands instead of a mixer or that you shouldn't roll it out much at all. The fact that they resembled scones at all was enough for me! All in all, last week was a bad baking week for me.

New Teams, More Bread


Every two weeks we are supposed to switch team members so that we can experience working with different personalities and skill levels. This week Chef Todd switched me from my partner Holly to my pastry pal Margaret. We already work great together at Paige's, so it's an extra special treat to be paired with her after my week of little failures. Today we worked on yeast breads, specifically brioche (first photo), focaccia (second photo), pretzels (third photo) and artisan-style rolls (last photo). I'm really breaded out at this point, but they did turn out pretty good. 
Photos are courtesy of Margaret and Autumn.

Monday, December 7, 2009

Epic Fail Day


I'm battling some kind of head cold/congestion thing at the moment, so I was feeling a bit confused,  exhausted and unmotivated today. This is probably why Team #2 (me and Holly) kept running into problems. First we had to make some quick breads. Holly and I were assigned to make a loaf of banana bread, apple spice bread and blueberry/cranberry bread. The first two came out just fine, but we happened to forget to take out the berry bread until someone pointed out that there was still a bread in the oven that was starting to burn. Oops! The funny thing is that we had both checked on it at some point, but not when it needed it most. You can see our sad little mistake pictured here against a backdrop of lovely, non-neglected breads. Fortunately, the inside came out just fine and tasted delicious — you just needed to remove the charred outer layer.

Team #2, Can't Make Pâte à Choux (pronounced pat-ah-shoo)
The second fail of the day came when we had to make pâte à choux, the light dough used to make eclairs and other pastries. We thought we'd mixed everything correctly until we realized that our dough wasn't dry enough to turn into a balled-up mound. Chef inspected it and suspected too much butter, but neither Holly or I could remember measuring it incorrectly. So we ended up scrapping our big mound of dough and had to start all over again while the rest of the class was starting to put theirs in the oven. The second batch turned out fine (with several, much-needed inspections from chef every step of the way).

The best part was that we were play-taunting Team #4 (Margaret, my co-apprentice at Paige's, and Tamara) with silly insults that rhymed with the word "four" and they shot back with the phrase "Team #2, Can't Make Pâte à Choux". How right they were!

So tonight's plans include a good dose of NyQuil and an early bedtime. Hopefully by tomorrow I will be more clear-headed and maybe help Team #2 cause less culinary destruction. Sorry Holly!

Thursday, December 3, 2009

Just Call Me the Crêpes Crusader

Since we are learning about quick breads, the class split into pairs which were each assigned a different quick bread. There were muffins, beignets, doughnuts, scones, biscuits and crêpes, which is what my partner Holly and I were assigned. We felt like we got the luck of the draw, because really, who doesn't like crêpes? They are actually pretty simple to make, the trickiest part is cooking them, but even that wasn't so bad after a few tries.


Holy Crêpe!
The key to cooking crêpes is to make sure your pan is oiled (but not heavily) and you keep the pan hot. When you drop the batter onto the pan, you should hear a sizzling sound. If you don't, crank up the heat a bit. Be sure to scoop just enough batter to THINLY coat the bottom of the pan. Crêpes are supposed to be very thin (see picture), kind of like a tortilla. Pick up the hot pan, tilt it towards you, then drop the batter on the side closest to you. Then QUICKLY start swiveling the pan around so that the batter swirls around the bottom in a thin, even coating. If you do this too slow the batter will clump in certain spots, which means the thick parts take longer to cook and the thin parts get overly browned. When you see the edges start to brown and loosen from the pan, flip it.

The Trick to Crêpe Flipping
If you want to impress people, try flipping the crêpe over in the air. The trick to doing this is to gently shake the crêpe loose first. If it is sticking to the pan, just push the edges loose with your finger. Once loosened, thrust the pan forward and slightly up in one quick motion. It's actually easier than you think and nobody in our class dropped a single crêpe on the floor. If you don't get it right, the crêpe usually just ends up either folded in the pan or hanging on the edge of the pan so don't worry about a big disaster. Just pick it up and flip it with your hand if it didn't work. It takes a little practice, but most of us got it by the third try.

Once you've flipped to the other side, don't leave it on the pan for very long at all. The second side shouldn't be browned like the first side, just heat it enough to cook it and keep it yellow in color. When it's done, drop it on a sheet pan with the brown side down, yellow side facing up. Traditionally, you fold it in half and then in half again so that you have a triangle a quarter of the size of the open crêpe. Now, you just need to top it with fruit, chocolate sauce, powdered sugar (that's what we used) or whatever tickles your fancy. Enjoy!

Tuesday, December 1, 2009

It Takes a (Gingerbread) Village


This week our class is building a gingerbread village to be displayed at the Dell Children's Hospital on Friday. We are working together on various large and small tasks to help construct the village quickly and get it done on time.

Since I have some artistic ability, I was assigned the lucky task of painting the creepy-looking white chocolate gnome with color cocoa butter (pictured at right). Chef Todd liked it so much, he is making a second white chocolate gnome for me to paint tomorrow. Awesome! The cocoa butter acts much like poster paint, so much so, that I forgot that I wasn't using paint. It dries awfully fast though, so if you're blending the colors to create a new shade, you have to work quickly before it dries and hardens.


Meanwhile, the others are working on constructing the houses and making the decorative elements out of the gingerbread to embellish our houses. Some are making the fences and stone pebbles for the walls and others are building the walls themselves and constructing the houses. It's a good team effort and everyone gets to try creating a lot of different items.


Things REALLY got fun when we covered one of the roofs with royal icing and chef brought out the blowtorch. A bunch of us took turns charring the tips of the royal icing peaks to give the roof some depth and texture. I finished up my day by helping a few of the others "pebble" one of the houses and shingle the roof with scallop-edged gingerbread cookies. They are all "glued" onto the houses with the royal icing, which hardens and acts as an edible cement.

We are close to completing all of the houses and should have everything but some finishing touches done by tomorrow.

Tuesday, November 24, 2009

A Little Behind on the Blogging

It's been pretty busy lately so I've gotten a little behind on the blogging. Sorry about that! So here's the scoop from the past week or so:

All is Quiet on the Exam Front
We've had to take one big exam and a quiz recently and I've passed both of those. Hooray! I wish I did a little better on the exam though. Also, we finally received our results from the ServSafe certification exam that we took the second week of school. Everyone in the class passed and received their certificates, so that is very good news for all. We have one more quiz on Monday (after Thanksgiving) and things will start to get cookin' — literally. Unfortunately, the quiz will be covering measurements and formula cost equations. Math. Goody. I just barely have a grip on the concept, so hopefully Monday's quiz won't have any unpleasant surprises that will lead my mathematically-challenged mind to a failing grade.

Written Reports and Pathetic Presentations
This week our class had to turn in a paper and give a ten-minute presentation on important figures in the culinary world. Our subjects were chosen by drawing and included such notable figures as Escoffier, Le Nôtre and Ewald Notter.

I drew Antoine Carême, the oldest of our research subjects and the first celebrity chef. I actually enjoyed researching Carême because he was such a fascinating person and he made such a huge impact on the culinary world. He was known as the "Chef of Kings and the King of Chefs" because of his many years of service to royalty (he baked Napoleon's wedding cake!) and his extraordinary ability to create elaborate art pieces from sugar. He is also credited for writing the first cookbook, creating haute cuisine and inventing the chef hat. Interesting, huh?

I really enjoyed writing the paper, but presenting it is another story. I am TERRIBLE at giving presentations. I am definitely not skilled at spontaneously forming concise, well-structured sentences in a timed, formal presentation with just some notes. Add a sprinkle of nervousness and the whole report feels like organized chaos in my head that comes out of mouth as random facts. Put me in a casual setting and I can prattle on about Carême easily, but trying to recite the majority of my paper without reading from it is just stressful. Plus, I tend to talk fast as it is and I talk even faster when I'm nervous. I swear I did my 10-minutes in about 5. I just hope the whole thing didn't look as awkward as I felt it did. I'm pretty confident that I wrote a strong, solid paper and my celebrity tabloid-style handout on Carême was fun. Hopefully that will compensate for my pathetic presentation skills!

Wednesday, November 18, 2009

Exam Time, Ganache and Piping

Is That Your Final Answer?
Today we had an exam on some of the topics that we've covered over the past week. This includes everything from the science behind baking, the anatomy of wheat, a gluttony of gluten facts and lots on leavening. It covered a pretty broad spectrum, but I think I did okay. We'll find out tomorrow.

Devil's Food Dipping and Piping
Today we took our tea-infused Devil's Food Cupcakes and dipped them in ganache made from scratch (high quality chocolate heated with cream). We each got to dip two cupcakes, which was a lot of fun and everyone seemed to do a great job with it. Because chocolate-dipped cupcakes look tasty but boring, Chef Todd gave us a chance to test our piping skills by letting us decorate the cakes. First he showed us how to make a piping cone out of triangles of parchment paper. Luckily, I learned this skill at the bakery (thanks Paige for the head-start!) so I was able to help others a bit. Then chef took a piping cone and filled it with heated white chocolate and showed us how to make rough horizontal lines and spirals. I was pretty happy with the way mine came out, but I have had a bit more practice. STILL need much more practice though.

A Tasty Save
Remember the disgusting tea that I mentioned in the previous post, the one that we were to infuse in a pound cake? Well, that pound cake got a reprieve! Chef Todd decided against it and found some wonderful-smelling Chai tea to use instead. The result was a fluffy and unique-tasting pound cake that we each got to try and take a bit home. Nice save chef!

Tuesday, November 17, 2009

Pizza Heaven, Devil's Food & Tea That Tastes Like Hell

A Slice of Heaven
We learned to make fresh pizza dough based on a recipe by Wolfgang Puck. We each got to make individual pizzas using 7 ounces of the dough that we made (and proofed) the day before. We were shown how to roll the dough into a ball and let it rest in order for the dough to rise for a little while. Then we rolled it out and some of us docked (perforate with a spiked roller) the dough, but chef said it wasn't required for the small pizzas. Then we got to top them with sauce, cheese and a small selection of toppings, including fresh basil, zucchini, onion and pepperoni. We were all thrilled that we got to eat a real lunch today and didn't have to survive on snacks until after class.

Tea with the Devil's Food
Wednesday night, CAA is hosting a seminar about tea and coffee, so we planned to make some tea-infused desserts. The first dessert was Devil's Food Cupcakes infused with very fragrant loose-leaf Vanilla Ceylon tea. The tea was infused by heating it with the milk that is part of the cake recipe (or formula, as chefs call it). If you do this, you must re-measure the infused milk after you strain and press it from the raw tea leaves because you will lose some of the liquid to the leaves. If you don't do this, your cake might end up a bit dry so be sure to add back the missing milk. The final result was a subtle hint of tea that adds a nice twist to traditional Devil's Food.

Hell has a Flavor
Next, we set up for the second tea-infused dessert — a Pound Cake — that we will make tomorrow. For this cake, we decided to use Lung Ching Dragonwell Green Tea to infuse with the milk. I've never tried this particular kind of green tea, but it's safe to say that I'm not a fan. From what I've read about it online, it's supposed to be a mellow, earthy, mildly sweet tea. Perhaps we had a rancid batch or something, but ours had a horribly bitter, spinach-like taste. We are going to go ahead and use it in the Pound Cake, but we will cut it in half and maybe add some honey to mask the bitterness. Hopefully, it will blend in with the other cake ingredients and take it down to a more palatable flavor that won't result in people making faces and desperately trying to wash out the lingering bitter taste. I guess we'll find out tomorrow!

Sunday, November 15, 2009

A New Face at Paige's Place

I've invited my culinary classmate Margaret to also earn her externship hours at Paige's Bakehouse. She lives in Round Rock and had heard me talking about working at a bakery there. Working with Paige has been a huge blessing for me and I believe that you should always try to share a good thing. This way, Paige gets free extra help for the busy holiday season, Margaret gets a great place to hone her baking experience and we all make a new friend. Win-win-win! I also think it will be great to have another classmate to share the externship with because we can bounce ideas off of each other and compare notes and experiences from class.

Who Says Three is a Crowd?
Margaret stopped by Paige's on Friday to check the place out and see if she would like to complete her externship there. I'd told Paige that Margaret was coming by and was interested in externing there too. I also let her know that I didn't mind sharing with another classmate, so long as it didn't affect my externship hours. I think Margaret will fit in just fine to the wacky fun that is Paige's Bakehouse.

So when Margaret dropped by, Paige invited her into the kitchen with us to observe and help out a bit. Paige had given me the duty of making the batter for a yellow, white and chocolate cake (for three different customer orders) from scratch on my own. Since this is now officially for the externship, she is allowing me to do even more than before, so that I gain experience...hooray! All three actually came out pretty good with only one minor hiccup on the chocolate cake. We doubled the recipe, but I must have forgotten to double the flour because the batter was watery. Paige added more flour to it though and it came out great!

Jack Daniel's Apple Pie and Yeasty Ciabatta Bread
Once that was finished, she asked Margaret if there was anything she would like to make. She chose to make a pie to take home to her husband and Paige suggested making her very popular Jack Daniel's Apple Pie. Ryan ordered one recently for his potluck lunch and it was a huge hit. I've never tried it, but I've helped her make it and it smells fantastic! Plus, it's the biggest pie I've ever seen — it's tall and very heavy. I helped prep the apples for the pie while Margaret observed the process since this was her first day.

I told Paige that Margaret was interested in baking breads, so Paige suggested we make ciabatta bread. The day before, Paige had made some yeast starter, which is live yeast that is grown with warm water and flour (and you can add yeast to boost it but that is optional). Live yeast starter can last forever so long as you keep it fed (remove half and add fresh flour and warm water), keep it warm (but not hot) and store it correctly. The older the starter, the better. She told us that some people have starter that had been made centuries ago and has been passed on since then! Paiges' starter batch was only a few days old though.

The yeast gave the uncooked ciabatta dough an almost gelatinous consistency that felt like a wobbly water balloon — or as the three of us giggled — a silicone implant. See, I told you the bakery is wacky fun. Paige then formed the dough into a loaf shape, sprinkled the top with flour, covered with a clean towel to protect it and put it in to bake. The end result was a very soft and tasty, loose-crumbed bread.

Tuesday, November 10, 2009

Exams, Biscotti and Fondant Made From Scratch

Whip Out That #2 Pencil
Our class is FINALLY finished going over the ServSafe book and completed the exam this morning. It was about 80 questions long, all multiple choice and not too difficult. According to those who have taken the SafeServ exam before for previous food service jobs, the questions were a bit harder than they had been in the past. Hopefully everyone passed, but we won't know for a few weeks. Cross your fingers!

Biscotti Break
Chef Todd made a batch of almond biscotti which we got to sample today. It's surprisingly simple to make considering how much your local coffee shop charges for them. Plus, the scratch batch was MUCH softer and tastier than what you normally find in a cafe. If you are a fan of biscotti, consider making your own. Just be sure to bake it twice — the first time as a solid log-shaped roll, then slice up the roll and bake a second time at a low temperature to get the crunch by drying it out.

Is Anyone Fond of Fondant?

The evening pastry class (they are further along in the curriculum) is working on wedding cakes as a final exam. So Chef Todd decided to make a large batch of fondant made from scratch so that the class will have it to use in lieu of frosting. Fondant can be purchased pre-made but it is VERY expensive for a small amount and it really isn't hard to make it yourself.

Most people that I know don't like the taste of fondant and often wonder why it is used at all. While it's true that fondant pales in comparison to buttercream frosting in terms of taste, it is great for achieving the clean, polished look that is often desired for wedding cakes. Buttercream can be smoothed out as well, but it would take a lot more time to perfect it and that could impact the cost of your cake. Also, Buttercream doesn't hold up as well as fondant when placed outdoors or in heat. Because the consistency of fondant is comparable to modeling clay, you also have more flexibility in design and for creating figures and other decorative pieces. So basically, it all comes down to aesthetics.

To make fondant yourself, you just need gelatin (for consistency, the gelatin that comes in plastic-looking sheet form is preferred over powdered), lots of powdered sugar, corn syrup and water. That's it! First, you'll want to melt the gelatin down into a liquid. Place the gelatin sheets in a container with a bit of cold water. If you dump the gelatin sheets in all at once, they tend to clump together and end up with a gelatin mass. So instead, place the gelatin sheets in the container individually to avoid that. The sheets will break down into a malleable goop which you should place in a strainer and squeeze to remove excess water. Then you will place this glob of gelatin in a container that will sit inside a pot of simmering — not boiling — water. Heat until the gelatin is liquified.

Then you will sift a LOT of powdered sugar to make sure that there aren't any clumps that might make your fondant lumpy. Then mix the powdered sugar, corn syrup and gelatin in a large mixer until it turns into a modeling clay-like consistency. Water can be added if it's a bit dry. Now you have fondant for your cakes, cupcakes or other baked goods. Fondant dries out very easily, so be sure to wrap it in plastic and store in an air-tight container. If stored properly, fondant can last a very long time.

Thursday, November 5, 2009

Creme Anglaise and "The Surgeon"

After spending the first half of class finishing the last three chapters of our giant food safety book (the exam is on Tuesday), the class headed to the kitchen to observe Chef Todd's culinary skills.

Creme Anglaise (pictured)

Chef began by showing us how to make a Creme Anglaise (French for English cream), which is a vanilla sauce that you can use as a base or pour on top of pastry or fruit (pictured). The ingredient list — eggs, milk, sugar and vanilla beans — makes the recipe seem deceivingly simple, but it is extremely temperature sensitive. If you overheat the mixture or lapse in stirring then it is very easy to end up with scrambled eggs instead of a creamy souffle topping. The final product looks a bit like eggnog and has a similar consistency to it as well. Chef Todd ended up with a little bit of scrambled egg when he got carried away explaining the procedure and forgot to stir for a moment. It was just a small amount though, so he strained it and still had plenty of tasty sauce to use. Sauce Anglaise is often called the "mother sauce" because it is the base of many recipes such as creme brulee and ice cream.

Candied Orange Rind and My Mad Surgery Skills

The next thing that Chef wanted to show us was how to make candied orange rind. You can use any citrus fruit such as lemon or lime (grapefruit isn't recommended because of bitterness), but orange is what we had on hand. He had each of us take a turn in prepping the rind by taking a paring knife and removing the bitter white part of the rind.

When it was my turn with the knife, my OCD kicked in and I became very intently focused on meticulously removing every inch of the white of the rind. I hadn't realized that a group of my classmates were watching my overly-precise handiwork until one commented, "She's so intense when she does it. It's like watching a surgery". I can't help it! I tend to be slow in a kitchen because I'm not a sloppy chopper and I like things to be balanced, clean and even. I told her that's why I want to be a cake decorator, because I can easily direct all of my focus into perfecting small details. With more knife practice, I can eventually get the same result but much faster. All in due time!

Once the rinds were ready, we put them in a boiling salt water to simmer and soften. Then you put in water with corn syrup and a bit of sugar and boil it again. Once that is done, we have to let them dry overnight. On Monday, we will dip the dried candied rinds into chocolate and our treat will be complete.

Caramel and Cleaning
With the remaining time, Chef Todd made a caramel sauce using heavy whipping cream, sugar, a splash of corn syrup and a squeeze of lemon juice to prevent crystallization. He even let us take some home! We ended the day with our first kitchen clean-up. We divided into teams and were shown how to clean everything from wiping down the tables to sanitizing and towel-drying the mop bucket. The chefs like things cleaned and put away with military precision. Not my favorite activity, but it all gets done in about 15 minutes with teams (30 minutes for a deep clean).

Wednesday, November 4, 2009

Culinary tool kits, creme brulee & poached pears


It was like Christmas morning when all of the students received their culinary tool kits — a small (quite heavy) suitcase with three sections stuffed full of all sorts of fun kitchen utensils and doodads. Unfortunately, the only thing we could use from the kit was the thermometer which we learned to calibrate in ice water. Not nearly as fun as baking, but it was a nice break from the hours of monotonous classroom lecture on food safety. While that information is important, it's extremely dull in the early morning.

Today was the first day to observe the chef in the kitchen. First, we got to snack on some pumpkin creme brulee, cake, eclairs and mousse made by the evening pastry class (they started school months ago and are further along in the curriculum). Delicious! After our snack break, Chef Tony showed us how to make poached pears in Cabernet Sauvignon. He basically brought wine, oranges, lemon and vanilla bean to a boil and then put in the pears until they were soft enough to easily put a toothpick through them. The kitchen smelled lovely, like mulled wine. We'll get to try the pears tomorrow after they soak in the wine mixture overnight. Can't wait!

Monday, November 2, 2009

First day of school!


Today was the first day of class at the Culinary Academy of Austin. Not a whole lot to report since the first few weeks primarily cover safety and cleanliness. I did get my uniform though! I really like the white chef's jacket (though it's just a tad big on me) and neckerchief (MUST learn to tie a Windsor knot!), but the baggy, houndstooth-patterned pants and chunky shoes are far from flattering. Oh well, I'll just try to look in the mirror from the waist up only.


The photo below shows the pastry kitchen where the pastry arts students learn to bake tasty treats (there is a larger kitchen in the adjacent room for the culinary classes). This photo was taken during the CAA Halloween open house, so no, it doesn't normally have balloons and silly ghosts hanging about. This is where I'll be spending most of the next six months with ten other future bakers. So far all of the other students seem really nice and vary in age and experience. It's a good, diverse mix of ladies, yes, all ladies.


But before we hit the kitchen, we have to hit the books for about 2-3 weeks. We have a food safety exam next Tuesday. It's been a while since I've had to study for an exam, so it's a little strange trying to get back into study mode post-college. Most of the information is pretty common sense , but it's the numerical information like time/temperatures/measurements that I have trouble retaining. Stupid number-resistant brain! It sounds like most of the math that I'll be involved with will be relatively basic so I should be okay. Also, reading about all of the foodborne pathogens —while interesting —kind of makes me nervous about eating anything that I didn't see prepared.

I'm still helping out at Paige's Bakehouse on Fridays since I don't have class those days. It will be great to have a place to apply my new knowledge and maybe learn more about those subjects from her. I'm forever grateful that Paige was nice enough to mentor me through my career change. I can't wait to see how this evolves over the next few months. I'll be sure to keep my readers posted though!

Wednesday, October 7, 2009

Bloody eyeballs and a pumpkin army


Today we kicked off the Halloween season by making:

• Bloody eyeballs (rice krispy treats and chocolate)
• Chocolate cake pops decorated as pumpkins
• Cupcakes topped with orange, black and bat-shaped Halloween sprinkles (not pictured)

I love this holiday! We're planning to make even more spooky treats over the next few weeks, so I'll be sure to post photos of these frequently.

Anyhow, back to today's activities. While Paige worked on the awesomely gross-looking rice krispy eyeballs, I got to fly solo with the pumpkin-themed cake pops pictured below.


To make this little pumpkin army, I hand-dipped each pop into orange-colored melted chocolate and let them cool. Once they cooled off, I had to hand-pipe each pumpkin face with melted dark chocolate.

Hand-piping such tiny details is pretty tricky to do on such a small surface while trying to keep your hands steady. You kind of have to work fairly quickly because once the piping chocolate starts to cool, it gets a bit stringy when you're trying to decorate. Overall, I think they came out pretty good considering that's my first time doing any real detail work. Detailing was always my favorite part of drawing, but I just need to get used to doing it with chocolate instead of a more easily controlled pencil. All in due time!

Sunday, September 27, 2009

Rodeo queens and everything in between

Batman and a desperate search for a pineapple upside-down cake
It's been pretty busy at the bakery lately, but that's a good thing because it means more business for Paige and more experience for me. I got to help out a lot on a Batman logo cake for a 16th birthday, which was pretty cool. I cut out a stencil of the logo for her and we cut it out in fondant. Plus, I got to frost the bottom of the cake with buttercream dots. Fun!

We also worked on a pineapple upside down-cake for a man who had ordered one for his birthday from another bakery but was so disappointed he ended up leaving it there because it barely had any pineapple and no cherries. So he asked Paige if she could make a good one with lots of pineapple as a birthday cake (this is two days after his birthday by the way — poor guy). So Paige made one with crushed pineapple and cherries in the cake batter, as well as tons of the fruits covering the top. It was great seeing his face light up when he saw the finished product and found exactly what he wanted.

Cupcakes galore!

We also got to make a bunch of cupcakes this week. One batch was for a Mickey Mouse-themed birthday and another was a simple cupcake wedding cake for a small wedding. For the Mickey Mouse cakes, I got to create Mickey silhouettes out of chocolate as toppers for the cupcakes while Paige made a more elaborate fondant Mickey face for the birthday boy. She let me make an elaborate Mickey too just for fun and practice. It came out pretty decent but he looks a tad crazy. I learned that even though fondant is a lot like Play-doh, it dries really quickly. That means you don't have a lot of time to sculpt before it starts getting dry and cracking. You have to almost constantly massage the fondant to keep it moist, but you can't do that when you shaping it into something. Lesson learned!

For the wedding cupcakes, the order called for a simple but elegant design of small dark chocolate-colored fondant flowers and silver dragees (edible metallic silver balls). I got to make all of the little flowers which look similar to the ones I made for the rodeo cake below. It's a simple technique to make the little flowers, but it has beautiful results.

Fit for a queen
The highlight of the week was making a 50th birthday cake for an ex-rodeo queen. Her friends wanted to get her a cake that celebrated those days that she is so fond of. They wanted a two-tiered cake that would resemble decorative stamped leather like you might see on a western-style belt. They also wanted a fondant sash that read "Rodeo Queen" and they requested colors that were feminine but not overtly girly and with a touch of turquoise. This would be topped with fresh flowers brought in from the client. I got to color all of the fondant (that's going to give me some toned arms) and make all of the little flowers that are dotted all along the sash. It took a lot of detail work to construct the cake, but the end result was truly gorgeous and fit for a (rodeo) queen.

Monday, September 14, 2009

A truly marble-lous technique

Paige was designing a cake for a client wanting a Tuscan sunflower theme. She began by drawing sunflowers on wax paper with yellow and brown icing, which will be placed in the freezer to harden until ready to apply to the cake. Next we had to decide what color fondant would work best to convey a Tuscany look. I suggested a light olive color to complement the bright yellow and brown sunflowers. Paige took that idea one step further by suggesting that we marble the olive green color with some brown. I was intrigued by that idea and hadn't known that fondant could be marbled. I'd never seen that done before.

First we started with white fondant, which she had me turn into the desired shade of green by adding green food coloring. That only gave us a pastel shade of green, so I kneaded in a bit of dark chocolate-colored fondant to get it to a more olive color. Once the green was ready, she began the marbling technique.

First, she rolled out the green fondant to a cylinder shape about the length of a rolling pin. She then cut some of the dark chocolate-colored fondant into a few thin 3-inch cylinder strips and placed those along the top of the green roll. She then rolled the two color together into one long cylinder which she folded in half, twisted a bit and kept rolling. You could see the marble effect instantly, but she continued to fold, twist and roll until she got the marbling look that she wanted.

The end result was beautiful and slightly reminiscent of Van Gogh's "Sunflowers" painting. The green/brown marbled fondant helped tone down the color of the icing sunflowers, preventing it from looking too bright or obnoxiously cheery. Instead, it looked sunnily sophisticated, cute but not cloying. Unfortunately, I don't have a picture of this gorgeous cake. My hands are often covered in food coloring, powdered sugar or fondant so I don't take photos, but I wish I had. Definitely need to start bringing my camera with me. Instead, I found a photo of a similar-looking sunflower cake online (shown here) but it doesn't quite look the same. The photo gives you an idea of the technique, but their colors are too bright and their sunflowers are flat (Paige's flowers were made of thin, hard icing placed along the sides and stuck up above the cake edges). You get the idea though.

Friday, September 11, 2009

A lot can happen in just 30 days!

I still can't believe that it was just about a month ago that I was sitting at my work desk thinking that I needed to get out of that office and move onto something else —anything else —ASAP. I'm still a little shocked to find myself getting ready to spend my afternoon helping out at a bakery and that I'm going to culinary school in November. It all happened so fast and so smoothly, that it hasn't quite sunk in completely. I take that as a good sign though. It's like all of the pieces are falling into place because I've finally stopped fighting to swim upstream, and instead, I'm going with the flow of the current.

I do relish the excitement of developing new potential and learning something different and challenging. Graphic design was beginning to feel a bit rote and routine, so it feels good to put that on hold for a bit to explore a new art form. I like waking up in the morning knowing that I won't be sitting at a desk all day and feeling like I'm in a rut. I'm in no way a morning person, but I actually wake up now with a little bit of excitement and anticipation for whatever I might be doing at the bakery. I like getting my hands in the sugary dough and finding them covered in flour and food coloring. I love the inevitable smile that happens when you're dipping duck-shaped cookies in brightly colored chocolate.

Yep, leaving the office world in the dust was definitely a good choice. I don't know exactly where this career will lead, but I know for certain that I'm not missing that desk chair one bit.

Wednesday, September 9, 2009

C is for cookie, that's good enough for me

Today was all about the cookies. Lots and lots of cookies. I REALLY like making the cookies. Paige was running low on her chocolate-dipped shortbread cookies, so it was my job to make dozens of them in all sorts of shapes (hearts, fish, ducks, gifts, etc.) and dip them in different color chocolates.

In seconds...flat
I started with the dough that Paige made and put them through this fancy dough-rolling machine. The machine allows you to roll dough into a measured height of your choosing. It's pretty easy to use, but it's also easy to send your dough flying off the rolling table if you don't let go of the lever in time. I came close once or twice but managed to get through the day without tossing my cookies, so to speak. Once the dough was rolled, I got to use the various cookie cutters (the fish were my favorite) to cut out enough to fill the baking sheet and then into the oven. Once the cookies were baked and cooled, we heated up chocolate in the color most appropriate for the shape.

That's the way the cookie crumbles
Dipping the cookies is really fun, but kind of tricky. Shortbread cookies are a bit fragile and certain shapes are prone to breaking when you shake off the excess chocolate. The hearts and gift boxes were the worst and a few of those had to be disposed of (either in the trash or in my mouth). I only lost 4 or five though — not too bad for an amateur! Tomorrow we get to add a little more flair to the dipped cookies, but we first need to let the chocolate cool and harden overnight. Paige will also show me how to cover a cake in fondant and make lace tomorrow, so I'm excited to learn that technique.

Friday, September 4, 2009

My first decorated cake and a splash of ganache

Paige let me create some mini-cakes, including one for me to decorate as I pleased (because I'd be the one eating it). She baked the layers, but let me construct the cake and choose the filling — chocolate and cherries of course. Once the layers were stacked, I had to frost them in buttercream so that it was smooth all over. This is actually frustratingly difficult. You don't want to frost it too thick, but sometimes smoothing out a part that is thin will end up having cake showing through. To fix it, you add more and have to smooth it again, which makes another part have cake peek through. Grrr. After frosting six cakes, I was finally getting better at it, but I still need to practice a lot more. She told me to go crazy with the decorating so I can get a feel of how it works, so please excuse the tackiness of swirls, dots, daisies and roses all in one cake. I'm fully aware that it is a major design faux pas, but I wanted to try a variety of things. I promise that my future cakes will look nothing like this, instead they will be awesome! The rose is the one that I made the day before. I'm actually pretty happy with it. So here's the final result:

 
After the cake was done, we got a rush order for some football-shaped cookies. Paige had to whip up a batch of football shortbread cookies since we were all out. Once those came out of the oven, she let me dip them in ganache (a chocolate/cream mixture) which was a lot of fun. We managed to get them done by the deadline. Hooray!

Thursday, September 3, 2009

With a little help from my friends

I just wanted to give a big heartfelt thanks to everyone for your kind words and encouragement. It can be a bit daunting to suddenly stop everything and take a chance on something new and different, but having the support of great friends and family is reassuring and quite touching. A very special thanks to Paige for taking in someone that she barely knew and offering to share her talents. Saving the best for last, I can't even begin to thank my husband Ryan for being so supportive of such a drastic career change. I am a very lucky lady to have such a wonderful man by my side and I see many desserts in your future! Once I get this whole baking thing down, I'm definitely going to have to have a cake party to thank all of you.

THANK YOU!!!

Caught red-handed...Rockin' out to Journey

Today was my first chance to dip my toe in the water before making the plunge. Paige (pictured) of the Round Rock bakery called Paige's Bakehouse has kindly offered to take me under her wing and allow me to apprentice at her bakery. It was unbelievably kind of her to do that and I am forever grateful for such an opportunity.

So today Paige taught me how to make fondant roses. We had to use red dye to get the rose color in the fondant, so now my hands look like I've been playing serial killer but that's all part of the fun! Working with fondant is very reminiscent of play-doh in consistency, texture and even slightly in smell. Creating the roses is actually pretty simple and involves mostly rolling and smooshing, but it still takes a bit of practice to perfect it.

She also showed me the best way to frost a cake, plus other random and very useful pieces of information. Much of this happened while chatting, joking around and rocking out to Journey. It's all fun and games till someone walks in and laughs at us because we're singing into spatulas to cheesy 80s power ballads. All in all, I have to say it was a great way to spend the day and can't wait to go back again tomorrow!

Insert shameless plug here: 
If you ever need a special cake or need to tame a sweet tooth, visit paigesbakehouse.com and order a little something or stop by the bakery and pick up a cookie, petit four, mini-cake or one the other tasty little treats to snack on. Not to mention that you might see me there! Seriously, she makes very pretty, delectable items at a very good price and she's as sweet as her treats.

Wednesday, September 2, 2009

You're doing what?!?

I think I may have caught some by surprise when I seemingly out-of-the-blue announced that I was thinking of putting aside my graphic design career to start a new one in cake decorating. I'm not exactly known for spending much time in the kitchen, but I do enjoy baking when the mood strikes me. Not to mention that I have a killer sweet tooth.

What many people didn't know is that I always thought it might be fun to decorate cakes for a living and actually wanted to do that as my first job when I was in high school. I've spent most of my life drawing and designing, so cake decorating seemed a natural fit. I had no experience or training in that area though, so I ended up working my first job as a cashier at Michael's Arts and Crafts (not a bad gig —I got great discounts on expensive art supplies). Yes, I was one of those art nerd people in high school and even a little bit in college. Since it's virtually impossible to make a career out of doodling, I chose to study graphic design/production art instead.

A case of the Mondays...everyday
This brings us to where I am now. Ten years of designing using mouse clicks and drags had become a bit of a drag. I've grown a little weary of being tethered to an office chair and trying to find inspiration while surrounded by office drama and staring at a glowing monitor. I started to worry that if I didn't escape the world of office drudgery soon, my passion for design might be snuffed out entirely. So I decided to quit my job and take a little time to figure out what I wanted to do with my career.

Back to School
That's when I started reconsidering the path not taken, a path paved in frosting. When I got stressed out at work, I would often joke with my coworkers about quitting and decorating cakes instead. It hadn't dawned on me yet that that was what I actually wanted to do. I guess what they say about there being an ounce of truth in every joke is true. Now I'm actually pursuing this path! I've applied with the Culinary Academy of Austin and will start their Pastry Arts Program on November 2nd and will have my certificate 6 months later. I feel excited, driven and inspired — things I hadn't felt in quite some time now. I got my fire back and I'm ready to take on the cake decorating world with frosting guns a-blazing!
 

From Fonts to Fondant | Creative Commons Attribution- Noncommercial License | Dandy Dandilion Designed by Simply Fabulous Blogger Templates