Wednesday, December 30, 2009

It's a Dog Eat Cookie World


I'm two months into my culinary training now, so what is the first thing I bake at home since I've started school? Dog treats. Yep, canine cuisine. This was inspired by the big number on the price tag for healthy dog treats at the store. It's very easy to make a big batch at home for much less and your dog will love them just as much. Both recipes were approved by our greyhound Lina.

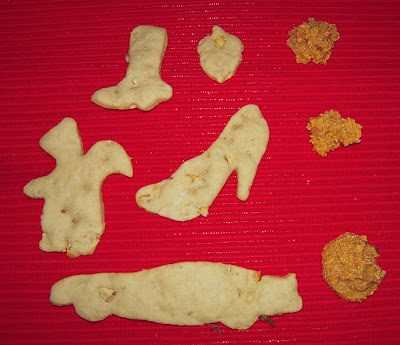
We made two kinds of treats. The first one is called Peanut Butter Puppy Poppers. These are the shaped cookies on the left side of the picture. I liked these best because they use just four ingredients (all of which you should have in your kitchen) and the dough is a good consistency for fun cookie-cutter shapes inspired by your dog's interests such as acorns, squirrels, shoes and fast cars (that one was more for Ryan actually). Here is the recipe:

Peanut Butter Puppy Poppers (from Bullwrinkle.com)
Ingredients
2 cups whole-wheat flour (we used all-purpose flour instead)
1 tbsp baking powder (we cut it to a half tbsp)
1 cup peanut butter (chunky or smooth)
1 cup milk

Directions:
Preheat oven to 375F. In a bowl, combine flour and baking powder. In another bowl, mix peanut butter and milk, then add to dry ingredients and mix well. Place dough on a lightly floured surface and knead. Roll dough to 1/4 inch thickness and cut out shapes. Bake for 20 minutes (ours took MUCH less time so keep an eye on them to prevent burning) on a greased baking sheet or parchment paper-lined baking sheet until lightly brown. Cool and store in an airtight container.

Carrot and Turkey Dog Treats (from all-natural-dog-treat.com)
These are actually called "Bonnie's Homemade Dog Treats" on the web site, but that isn't very descriptive. These treats are the orange-colored round mounds on the right side of the photo above. This recipe might require a trip to the store since you probably don't have all of the ingredient in your pantry. The four ingredients are cheap and easy to find, so don't worry. This recipe makes a very wet dough, so you can't make fun shapes with it but your dog doesn't really care about that.

Ingredients:
1 cup Cream of Wheat (dry)-we did not buy the instant kind
1 cup Carnation Dry Milk (lowfat and dry)
1 small jar of carrot baby food
1 small jar of turkey dinner baby food (it has green beans, squash and barley)

Directions
Mix ingredients together. Drop onto a parchment paper lined cookie sheet in size you desire. Bake at 350F until lightly browned on edges, then cool. We baked them on two cookie sheets in dime- or nickel-sized drops.
Sunday, December 20, 2009

Last Week of Culinary School till January

More Bread
It seems like the bread portion of this class will never end! We even have two more weeks of it when we return in January. Sigh. I have to admit that I did enjoy making the braided challah bread (holla!) pictured on the left, but I'm ready to move on now.

We also made several other breads including rich, tasty brioche (the small round ones in the photo on the right) and a rolled cinnamon loaf (also pictured) which I believe was made from bruchetta dough.

We did get a little break from the breads last week. Dell was coming to CAA for a team building trip, so we made a variety of christmas treats to give as gift bags and for us to take home.


Margaret and I made two varieties of meringue: almond and peppermint. The end result should be similar those little square-shaped pastel dessert mints but shaped like a large hershey's kiss or a round mound.

However, the deck ovens below ours were too hot and caused our oven to be too hot. This caused the almond meringues to flatten out and harden to a crunchy cookie-like consistency. They looked liked cookies, tasted like cookies, so we rolled with it and made them into cookies. We melted some chocolate and dipped our "almond meringues" and added a single almond on top for a touch of elegance, then we jokingly called them "rustic" cookies. They were actually very tasty though and would go great with coffee like a biscotti.

Our second attempt at meringue was a little more successful, but the peppermint version was still slightly sabotaged by the overly hot ovens. Having learned our lesson from the first batch, we lowered the heat on our oven considerably, and eventually turned it off altogether, but it still gave our meringue a slightly toasted color when they should be bright white. However, the shape and consistency came out just fine so we just had to look past the slight toasting and enjoy the final result.

I really enjoyed making the meringue and learned a lot about the process. We had a guest chef (also named Tracey) come in to observe our class since she will begin teaching a pastry class in January. She did a fantastic job of explaining the three stages of meringue.

First you whip the egg white mixture into a soft peak, which you can tell by stopping the mixer and dipping the whip into the mix, swirl it, lift it straight up, then turn it upside down. If the mixture makes what she called a "dairy queen curl" then you have a soft peak. At this point you add in your sugar and any other flavorings — this is your last chance to add ingredients without messing up your meringue. Next you whip some more until you reach a hard peak. You can use the dip, swirl and flip method to determine what stage you are at. At a medium peak, the mix will form a little hook, not the full curl of a soft peak. You've reached a hard peak when the mix points straight up.

Once you are done whipping, you must move very quickly to set up your baking sheet and get it in the oven. The meringue gets warm pretty fast at room temperature and will lose structure, part of the reason why our almond version got flat. It's very important to have your piping bag with star tip and cookie sheet (with parchment paper glued down at the corners with a dab of the meringue mix) ready to go. To get the striped effect on your meringue, paint stripes inside your piping bag with food coloring. If it starts to fade, you can scrape out your mix and quickly repaint your stripes.

It is also important to keep your piping bag in a straight vertical to avoid lopsided meringues. This is trickier than you think, especially when the mix starts to soften and get runny. For a good, consistent result, count to four as you are piping to ensure they are the same size, then stop squeezing the bag, pull the bag straight up and maybe give it a slight swirl to break of the mix. If you mess up and your meringue drop is too small, too big, lopsided or too pointy, then just scrape it off and try again or else you might end up under- or over-cooking it or it will just look bad. Just remember to work very quickly. Once you are done, then you will put it in the oven at a very low temperature. You aren't cooking it so much as you are drying it out. They're done when they are completely dry in the middle and light as a feather.

Monday, December 14, 2009

Best Chocolate This Side of Europe...in BASTROP!


ROSCAR Bonbons and Truffles in Bastrop

After the stress of our quick breads exam, Margaret and I decided to treat ourselves by taking a trip out to Lost Pines in Bastrop to experience fresh, handmade artisan chocolate at ROSCAR (www.roscar.com). I can't even begin to describe how amazing the chocolate is, I was truly blown away. And in Bastrop of all places!?! Seriously, Godiva doesn't even compare to the obviously fresh and high-quality Belgian chocolate delicacies created by European-trained master chef Frans Hendrik. They don't use oils or extracts to capture the flavor, instead they infuse it into the chocolate.


First, let's start with the scenery. The building is an adorable log cabin surrounded by pine trees. You kind of just want to sit on the porch, nibble at your amazing chocolates and stare out at the pine trees. Lovely! Then you step inside the building and you're completely enveloped by the coziness of the country-style woodsy interior and the heavenly (but not overwhelming) scent of chocolate.

The shelves are stocked with jars of ganache, specialty teas and gift ideas. There is also a video showing Frans Hendrik hand-making the chocolates that you see displayed in the glass counter. Artisan chocolate isn't something that you can easily find in Texas, or in the U.S. for that matter.

TASTINGS & PRICES
Now that you've taken in the scenery, you're ready for the tasting room. The kind ladies at the counter are happy to give you a small taste of either truffles or bonbons to help you find something you like. Well, you'll like them all but it certainly helps narrow down your choices since they aren't cheap. However, you can purchase a box of 4 truffles and 6 bonbons for less than $20 or just buy one or two for about $2 a piece. Not bad for chocolate of this caliber. Click on the last photo for price listings.

TRUFFLES

The flavors available at ROSCAR range from classic to truly unique. You can check out their website for a list of all the available flavors. Out of the truffles, the more unique offerings included Tequila-Lime Jalapeno (pretty good and I hate jalapeno, you don't really taste it but there is a little hot sensation), Spicy Thai Peanut (just a hint of spicy)  and Champagne (one of my faves).

BONBONS
Unique chocolate bonbons included Dark Chocolate Basil (I liked the odd pairing, but Ryan didn't care much for it), Cajeta (make with goat's milk), Green Tea, Ginger, New Orleans Punch (reminded me of eggnog a little bit) and Cabernet (GREAT pairing). The last photo on the right is high-resolution, so you should be able to click on it and read the prices/chocolate descriptions.

If you are a fan of chocolate or know someone who is, you owe it to yourself or your loved ones to experience this place. I would advise calling ahead of time to make sure the tasting room will be available and to get directions.

Rough Week

I'm a little behind on the blogging once again, but this is my meager attempt to get up to speed. I've been battling a miserable head cold for most of the week (including today) so I haven't been feeling up for writing much. However, since this is the last week of class until January 4 I figured I should post a little something before the holiday break.

Man Can't Live On Bread Alone
We've been working on both quick breads and yeast breads, and let me tell you, I don't think breads are my forte. Last week, we were tested on our bread-making skills and were given the task of individually making an apple spice bread and scones. We've been working in teams for everything (and will be throughout the course for the most part), so the exam was the first time we've flown solo. Plus, we could only bring the list of ingredients, meaning we had to memorize the procedure.

Needless to say, this didn't go well for a lot of people — myself included. My spice bread was way too salty because I think my pinch of salt must have been too pinchy. That's really frustrating since my team had experience with the spice bread already so it should have come out fine. Grrr. My scones weren't great but they were at least edible. My team, and I think one other team, were never assigned scones during class (we got spice bread and crêpes), so we were kind of flying blind on that one. If you've never seen it made, it's hard to know that the scone dough is supposed to be super sticky, that it's best to mix it with your hands instead of a mixer or that you shouldn't roll it out much at all. The fact that they resembled scones at all was enough for me! All in all, last week was a bad baking week for me.

New Teams, More Bread


Every two weeks we are supposed to switch team members so that we can experience working with different personalities and skill levels. This week Chef Todd switched me from my partner Holly to my pastry pal Margaret. We already work great together at Paige's, so it's an extra special treat to be paired with her after my week of little failures. Today we worked on yeast breads, specifically brioche (first photo), focaccia (second photo), pretzels (third photo) and artisan-style rolls (last photo). I'm really breaded out at this point, but they did turn out pretty good. 
Photos are courtesy of Margaret and Autumn.

Monday, December 7, 2009

Epic Fail Day


I'm battling some kind of head cold/congestion thing at the moment, so I was feeling a bit confused,  exhausted and unmotivated today. This is probably why Team #2 (me and Holly) kept running into problems. First we had to make some quick breads. Holly and I were assigned to make a loaf of banana bread, apple spice bread and blueberry/cranberry bread. The first two came out just fine, but we happened to forget to take out the berry bread until someone pointed out that there was still a bread in the oven that was starting to burn. Oops! The funny thing is that we had both checked on it at some point, but not when it needed it most. You can see our sad little mistake pictured here against a backdrop of lovely, non-neglected breads. Fortunately, the inside came out just fine and tasted delicious — you just needed to remove the charred outer layer.

Team #2, Can't Make Pâte à Choux (pronounced pat-ah-shoo)
The second fail of the day came when we had to make pâte à choux, the light dough used to make eclairs and other pastries. We thought we'd mixed everything correctly until we realized that our dough wasn't dry enough to turn into a balled-up mound. Chef inspected it and suspected too much butter, but neither Holly or I could remember measuring it incorrectly. So we ended up scrapping our big mound of dough and had to start all over again while the rest of the class was starting to put theirs in the oven. The second batch turned out fine (with several, much-needed inspections from chef every step of the way).

The best part was that we were play-taunting Team #4 (Margaret, my co-apprentice at Paige's, and Tamara) with silly insults that rhymed with the word "four" and they shot back with the phrase "Team #2, Can't Make Pâte à Choux". How right they were!

So tonight's plans include a good dose of NyQuil and an early bedtime. Hopefully by tomorrow I will be more clear-headed and maybe help Team #2 cause less culinary destruction. Sorry Holly!

Thursday, December 3, 2009

Just Call Me the Crêpes Crusader

Since we are learning about quick breads, the class split into pairs which were each assigned a different quick bread. There were muffins, beignets, doughnuts, scones, biscuits and crêpes, which is what my partner Holly and I were assigned. We felt like we got the luck of the draw, because really, who doesn't like crêpes? They are actually pretty simple to make, the trickiest part is cooking them, but even that wasn't so bad after a few tries.


Holy Crêpe!
The key to cooking crêpes is to make sure your pan is oiled (but not heavily) and you keep the pan hot. When you drop the batter onto the pan, you should hear a sizzling sound. If you don't, crank up the heat a bit. Be sure to scoop just enough batter to THINLY coat the bottom of the pan. Crêpes are supposed to be very thin (see picture), kind of like a tortilla. Pick up the hot pan, tilt it towards you, then drop the batter on the side closest to you. Then QUICKLY start swiveling the pan around so that the batter swirls around the bottom in a thin, even coating. If you do this too slow the batter will clump in certain spots, which means the thick parts take longer to cook and the thin parts get overly browned. When you see the edges start to brown and loosen from the pan, flip it.

The Trick to Crêpe Flipping
If you want to impress people, try flipping the crêpe over in the air. The trick to doing this is to gently shake the crêpe loose first. If it is sticking to the pan, just push the edges loose with your finger. Once loosened, thrust the pan forward and slightly up in one quick motion. It's actually easier than you think and nobody in our class dropped a single crêpe on the floor. If you don't get it right, the crêpe usually just ends up either folded in the pan or hanging on the edge of the pan so don't worry about a big disaster. Just pick it up and flip it with your hand if it didn't work. It takes a little practice, but most of us got it by the third try.

Once you've flipped to the other side, don't leave it on the pan for very long at all. The second side shouldn't be browned like the first side, just heat it enough to cook it and keep it yellow in color. When it's done, drop it on a sheet pan with the brown side down, yellow side facing up. Traditionally, you fold it in half and then in half again so that you have a triangle a quarter of the size of the open crêpe. Now, you just need to top it with fruit, chocolate sauce, powdered sugar (that's what we used) or whatever tickles your fancy. Enjoy!

Tuesday, December 1, 2009

It Takes a (Gingerbread) Village


This week our class is building a gingerbread village to be displayed at the Dell Children's Hospital on Friday. We are working together on various large and small tasks to help construct the village quickly and get it done on time.

Since I have some artistic ability, I was assigned the lucky task of painting the creepy-looking white chocolate gnome with color cocoa butter (pictured at right). Chef Todd liked it so much, he is making a second white chocolate gnome for me to paint tomorrow. Awesome! The cocoa butter acts much like poster paint, so much so, that I forgot that I wasn't using paint. It dries awfully fast though, so if you're blending the colors to create a new shade, you have to work quickly before it dries and hardens.


Meanwhile, the others are working on constructing the houses and making the decorative elements out of the gingerbread to embellish our houses. Some are making the fences and stone pebbles for the walls and others are building the walls themselves and constructing the houses. It's a good team effort and everyone gets to try creating a lot of different items.


Things REALLY got fun when we covered one of the roofs with royal icing and chef brought out the blowtorch. A bunch of us took turns charring the tips of the royal icing peaks to give the roof some depth and texture. I finished up my day by helping a few of the others "pebble" one of the houses and shingle the roof with scallop-edged gingerbread cookies. They are all "glued" onto the houses with the royal icing, which hardens and acts as an edible cement.

We are close to completing all of the houses and should have everything but some finishing touches done by tomorrow.
 

From Fonts to Fondant | Creative Commons Attribution- Noncommercial License | Dandy Dandilion Designed by Simply Fabulous Blogger Templates