Sunday, March 28, 2010

Cats, Cotton and Cakes Galore!

I've been pretty busy helping out at Blue Note lately. I'm truly flattered that they trust my design skills to allow me to decorate cakes and create wedding toppers. You feel a little pressured to get it just right and not look like a culinary student made it since people are paying for it and featuring the cake at their wedding, birthday or shower. I'm learning a lot by helping out though and it's great practice to hone my skills to a more effortless flow. Here's what I've made lately:

Kitty Cake Topper
A couple requested a five-tiered wedding cake, plain white and nothing else on it but a simple beaded border and their two cats sitting on top. They even provided photos of their adorable kitties, a striped yellow tabby and a black tortoiseshell. Cute! It was fun creating the kitties out of gumpaste, but knowing that they were the main visual on the cake added some pressure. I love animals though and they have always been my main subject in my art, so I knew exactly how to pull it off. I even made sure to capture the unique patterns and patches that give the kitties their unique identity.  I'm really happy with the finished kitties and I hope it met the couple's expectations for their special day.


Cotton-Pickin' Cake
Someone ordered a birthday cake for their papaw who is a cotton farmer, so they requested the cake resemble a cotton farm with a tractor and a cowboy hat and boots. The bakery already baked and iced the cake, so they gave me a bit of guidance for decorating and then let me at it. I'm always astounded that they let me do so much on the cakes, but they always seem pretty happy with the result so I must be doing something right. All those years of art classes and doodling can pay off! I really like working with fondant and gumpaste, now I'm starting to really like modeling chocolate too (the boots).

Airplane Cupcakes Take Flight
An order for a baby shower led to these adorable airplane cupcakes. I used fondant and a little bit of innovation to create the little airplane pieces. I love the challenge of trying to come up with efficient and effective ways to create cake decorations. It would take too long to hand-cut 18 identical fondant airplanes, so you have to come up with short-cut techniques to get the job done. I had a moment of inspiration when looking amongst the collection of cookie-cutters for something to make propellers. I spotted a butterfly cutter and noticed that the top half of the wings were long, thin and even tapered in the center — just like a propeller. It worked beautifully and I even used the bottom half of the butterfly wings for tail fins. It may seem a little weird, but things like that excite me the way solving crossword puzzles excites people. Eureka moments are exciting no matter what problem you're solving...including cake!

A Shot at a Twist of Lime
Lastly, I helped out with this tequila-themed birthday cake. I didn't design the bottle, but I did paint the table, salt shaker and limes. I'm all about the little details, so I had a blast painting the table's wood texture and giving the limes segments and pulp.

Yep, I've definitely chosen a fun career. Designing on a computer is fun, but it's not quite as thrilling as taking a lump of white fondant and turning it into a cat, tractor or limes that will help make someone's special day that much more special.

Shake Your Tailfeathers...the Peacock is Done!

On Thursday, I finally completed my last practical exam for culinary school. The assignment was to design either a wedding cake or a celebration cake in the design of our choice (chef suggested we do a simple design, but I like a challenge), no larger than 12 inches for the cake and no more than two-tiers. We had to provide a sketch of the cake and cost out how much it would cost to make the cake and how much you would charge your client. It was a lot of work, but also a lot of fun and I'm happy with the final result considering I have never made a wedding cake before.

Not an Easy Feat
During class, we had to present our cake one-on-one with the chef in a separate room for review. Apparently, he judged everyone a bit harshly and was sparse with the compliments. Sure the cakes might look a little rough, but for many of us this was either our first (or one of just a few) cakes to decorate or our first time using gumpaste/fondant. I'm all for critique (that's how you learn and grow your skills), but it helps to balance out criticism with a little positive commentary as well — especially for the fragile confidence of the inexperienced.

My Critique
Based on that, I have absolutely no idea what my grade on this will be. In my critique, it was pointed out that the peacock should have been realistic looking and I should have hand-painted the feathers since I have painting skills. I never intended it to look realistic, I wanted an artistic interpretation of the peacock pattern and colors just as my sketch illustrated. This conflicted with the chef's comment that the final cake isn't exactly like my sketch because the teardrops around the cake aren't pointed in the right direction and the wings are slightly different. So first he says that it isn't exactly like my sketch, then he says that I should have painted realistic feathers (which was not in the sketch). So confusing!

He also pointed out that the royal icing that I used to "glue" the feathers could be seen seeping out of the sides. I agree with that one, it is a little bit messy. However, I've never worked with gumpaste before and the feathers were extremely fragile and kept breaking. So once I finally got them on the cake intact, I didn't dare touch them again. He also commented that the bead piped around the cake are messy. I agree with that as well, but that is partially because the icing that some of us were using wasn't very good and tended to either clump up or  drip messily when piped. We were all out of buttercream at that point and too close to deadline to bother making more so we just used what we had.

Overall, I'm very happy with the final result. It was very close to what I envisioned and I managed to pull off a complex design independently. Not too shabby for being the third cake I've ever designed. Despite the harsh criticism, I did manage to get a reluctant compliment out of the chef, "I guess it looks good....I guess." Considering the situation, I'll take that as praise and as a small victory.

Monday, March 22, 2010

Fondant is Ruffling My Feathers

School is quickly coming to an end and the final projects are beginning to pile up. We only have 11 class days left, but in that time we still have a written exam, a wedding cake, the final buffet as well as regular class activities. Life has been a tad hectic lately, but I'm really enjoying designing the wedding cake!

I've been fixated on the idea of a peacock wedding cake for some time now and am giddy to finally start bringing that idea to life. We were encouraged to keep the cakes under 12 inches, so that definitely makes things easier. I decided on a two-tier cake (10- and 6-inch) covered in fondant and topped with a peacock and draped in fondant or gumpaste feathers. As per the assignment, I sketched my cake and priced out the cost of the cake based on ingredients. I tend to be a bit mathematically-challenged, so it took some time figuring out what 12 oz. of flour costs if you buy it at about $20 for 50 pounds. Once I dusted off the math part of my brain though, it all started to make sense and calculate quicker.

I started by working on the peacock's body. I first sculpted the shape using rice crispy treats because they are easy to mold, lightweight and strong enough to hold the form and support the bird's vertical neck. Plus it's easy to make and you get a tasty reward with the leftovers! Then I had to drape a first layer of  fondant (adhering it with a light smeary coat of frosting) over the rice crispy body to hide the bumps of the cereal. Once that was set, then I draped the final fondant layer and smoothed it out. It worked beautifully!

Next I carved out the wings in fondant using an x-acto knife and adhering it to the body with vodka (the alcohol evaporates and leaves no flavor or color). Then I used a leaf-shaped cookie cutter to create tail feathers out of gumpaste (really fondant with tylose powder added to make it harden stiff) in various colors. However, I've now run into issues of the feathers cracking or not staying glued together in a fan shape. It looks complete in the photo, but if I try to pick it up then things either break or become unattached. I've made more gumpaste feathers —this time even thinner — and will make a second tail to see if it will work better. I'll keep you posted, but I like the bird so far!

Monday, March 15, 2010

Contemplating Plating for your Palate


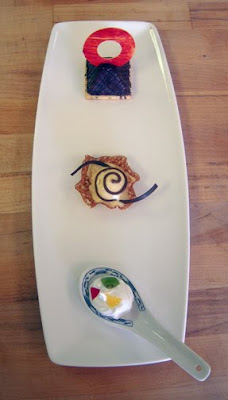
We are currently working on plating desserts in a manner that is attractive and has a variety of colors, temperatures and textures. Plating allows you to be creative — basically the plate becomes your palette to please palates.

Before we started practicing our plating styles, we had to create and stockpile a variety of desserts and sauces. For the featured dessert on our plate designs, we created dozens of small-sized flourless cakes, cheesecakes, shortbread cookies and a variety of homemade ice creams and sorbets. These would serve as the foundation for plated dessert and the primary flavor.

Since most of those desserts were soft in texture, we created a variety of crunchy and crispy desserts to be used as accoutrements to offset the creamy feel of the main dessert. These included chocolate pieces, melted, brandy snaps, colored sugar in abstract shapes and tuile.

Tuile is a very thin, fragile, crispy cookie that can be molded into a variety of shapes and designs and is a versatile garnish. It is fairly easy to make and is great to serve with desserts (especially ice cream). Our class got to play with the tuile a bit by cutting shapes into acetate or cardboard which you will spread your tuile batter over to create your shaped cookie. You can use a cookie cutter and an utility blade to create a shape or you can draw your own. I drew a bunny shape which was really fun and kept me smiling all day. How can you not smile when there is a bunny sitting on cheesecake? You could also form the baked tuile into curved shapes using pencils, rolling pins and bowls. However, you have to work extremely fast since the tuile starts hardening seconds after being removed from the oven. It's usually easier to keep the oven door open and work with it inside the oven. I said it was easier, not necessarily safer.

Finally, we had to create sauces to provide a third texture and flavor for our plating. Each team made a different flavor including chocolate sauce, raspberry coulis and a pineapple sauce. We also had a variety of fruits and even fresh mint from the school's garden to provide additional garnish. From there, it was up to us to design a plate mixing and matching all of these items into an appealing and palatable manner. As our chef is fond of saying...the possibilities are endless!

Held in Custard-y

It's the Final Countdown!
We now have only 15 class days left until we are done with culinary school. Hooray! It's been fun, but I think we're all anxious to move on to a real pastry job now. April 8th is the last day so mark your calendar (I know I have).

Jiggle it, Just a Little Bit
I think the custard section of our class in now over, but it couldn't end soon enough for me. I am not a fan of goopy, gelatinous desserts (gummy bears and cheesecake are an exception). So the idea of spending an entire week making tons of eggy, wobbly creme brulee (top right photo), clafoutis (left photo), flan and cheesecake left me less than enthusiastic. Add to that the danger of spilling scalding hot water on your arms when trying to pull these desserts out of the oven (they sit in a heavy sheet pan full of water to prevent burning the outside) and you have a very long, unhappy week.

However, it might have been worth it for the discovery of a delicious flourless cake (bottom right photo) recipe. Yes, it had some wobble to it, but it was comparable to cheesecake consistency and it was oh-so-chocolatey and adorable coming out of those pyramid molds!

Another highlight to custard week was getting to use a culinary torch to burn the sugar that sits on top of the creme brulee to create that signature carmelized crust. I don't want to eat it, but I do want to torch it!

Thursday, March 11, 2010

Brushing Up on My Art Skills


Cutest. Cake. EVER
Last Friday at Blue Note Bakery, I got to make the flowers (and paint them!) for a lei that would drape across a 50th anniversary cake. I LOVE this cake. I think that people would try to avoid divorces if they knew they could get a cake like this on their 50th anniversary. The colors are beautiful — tropical without being overly bright or cloying. The coconut is just too cute for words and though I'm not an Elvis fan, I'm a fan of this one

Couture Cake
I got to use my art skills by painting logos and flowers with food coloring. Fun! One order requested that the cake be covered with couture logos (Chanel, Gucci, Louis Vuitton and Hermes) and use the patterns and colors from a Louis Vuitton scarf. I really enjoyed painting the logos on the fondant — even if the Gucci logo was a bit challenging. After those pieces were done, I even got to place them on the cake. The rest of the cake was completed by the mega-talented Blue Note staff.

Puppy Love
There was one other cake that I helped with just a little bit, but it's a doggone adorable one. Someone wanted their dog (I believe it was a schnauzer) Archie to top their cake. Angie created the sweet little guy out of gumpaste and I helped texturize it to give the impression of fur and gave him toes. How could you not melt a little when you look at that gumpaste face? I kinda hope nobody eats him.

Who Knew Stamping Was So Tricky?
I was also given the task of using alphabet stamps to spell "happy birthday mom" on a fondant plaque. FAIL! You wouldn't think that stamping would be so tricky, but it's not as easy as you might think. Between making sure the stamp isn't too wet, too dry or too messy and making sure the letters line up both vertically and horizontally and have even spacing — mistakes are just waiting to be made. After numerous practice attempts, dozens of imperfections and a lot of time, Angie had to step in and work her stamping magic. Of course, she did it perfectly on the first try. I think I'll stick with freehand design.

Sunday, March 7, 2010

Know When to Hold Em' and When to Fold Em'


I'll start off by saying that Grandma's birthday cake was a delicious, moist and chocolatey hit. The final result was very close to what I envisioned from the start, so I'm pretty happy with my first cake. That's not to say that I didn't run into a few snags along the way.

I started with the fondant cards and suit shapes earlier this week. The fondant recipe worked amazingly well with the painting, but could have done better with the hardening since they were still a little flexible. All in all, they worked out beautifully and I'm very proud of the way they turned out. It's always a bit of a surprise to see what you imagine come to life.

Recipes from an Ex-Con
Next came the baking of the cake. I couldn't find a tried-and-true chocolate cake recipe that is known to be moist and flavorful. The cake recipes we used in culinary school tended to be dry and a bit on the bland side, no one was a fan of any of those. My friend Margaret suggested that I try Martha Stewart's  (http://www.marthastewart.com/recipe/best-chocolate-cake) since she had been pleased with her other recipes. It was absolutely perfect — exactly what I was looking for in a chocolate cake! It baked perfectly and was amazingly moist. We filled the center with homemade strawberry jam given to us by a friend. Yum! However, the cake pans I have flare out on the sides a bit, so the cakes had a slight trapezoidal shape. I straightened them as best as I could, but the sides aren't quite flush (card pun intended). Oh well, it worked out pretty nicely overall.

Osh Kosh Ganache
Lastly, I had to make the chocolate ganache glaze to drizzle over the cake. This is where things started to come undone. At this point it was 10 o'clock in the evening after a busy day at the bakery and a long week on my feet. I was exhausted and ready to finish the cake that I had been working on all week. Ganache is relatively simple, being comprised of just heated heavy cream and chocolate, so I thought the finish line was finally in sight. Oh, how wrong I was!

Ahhh...Freak Out!
Using a double-boiler, I heated the heavy whipping cream then removed it from the heat and stirred in the chocolate. That's when I noticed that the mixture had a weird oily separation. I continued to stir it, but the oil would not go away. I was out of chocolate and cream and it was now about 10:30 pm so I couldn't even try again. This is when the mini-freak-out commenced.

My poor, sweet husband Ryan was trying to reassure me that it would be okay and we could just buy a cake at the store, but I couldn't fathom doing that. I had just spent most of the week working towards this cake, how could I just give up and buy a store-made one? I was just too exhausted to deal with it so we agreed to just buy a jar of frosting to top it before we headed out to grandma's house in Waco in the morning.

My Husband the Hero
Well, Ryan (the morning person) was nice enough to go to the store to pick up the frosting but he also bought more chocolate and cream so we could give the ganache another go. I'm so lucky to have such a sweet husband who believes in me! While he was at the store, I started heating the water for the double-boiler and it was ready by the time he got back. However, even on the second attempt I still had the oil problem. Ryan had googled this issue the night before and apparently it's a common problem remedied by vigorous whisking. So that's what we did and problem solved! The end result wasn't as liquid and syrupy as it is in school, but it worked as a glassy, spreadable frosting. No need to use the jar stuff...hooray! We quickly assembled the fondant accessories, loaded the cake in the car and headed to grandma's.

We arrived in Waco on time and grandma and my sister-in-law Nicole were very pleased with the homemade cake. I was just relieved that it tasted delicious, didn't come in a grocery store box and didn't look like it belonged on Cake Wrecks. Phew!

So who has the next birthday? I'm ready!

Thursday, March 4, 2010

Grandma-in-Law's Bridge-themed Birthday Cake

This week my husband and I will be visiting his grandma to celebrate her 81st birthday. My gift to her is to bake her cake, which will also be my very first "professional" (or what our chef would call "non-housewifey") cake.

I decided to make a chocolate cake with a layer of strawberry jam and covered with chocolate ganache glaze. Since grandma loves to play bridge, I decided to decorate the cake with a playing card theme. My vision was to have the suits made of marshmallow fondant and placed around the sides of the cake. Then I would top the cake with hand-painted, oversized playing cards (also made of fondant) that would display her age (an 8 and an ace card) and a queen face card since she is queen of the day.

Surprisingly, it's all coming together very smoothly and I'm really happy with the way the cards turned out. I wasn't sure how the food coloring would take when I painted it onto the fondant, but it worked beautifully and didn't bleed outside the painted lines.

The only thing I'm not quite happy with is the fact that the fondant didn't stiffen as much as I'd like. The fondant recipe we used in school dried really hard but didn't taste very good, so I tried a marshmallow fondant recipe (see below) that I've heard good things about. It's super easy to make, tastes like marshmallow and is pretty easy to work with. It's great for the smaller pieces like the suit shapes, but the playing cards won't stand up straight because they're still slightly flexible. That's okay though, I can just use a few bamboo skewers to use as an easel to prop up the cards. I'll just have to remember the flexibility factor next time I make something thin and large out of fondant.

Tomorrow I will make the cake — hopefully it will come out okay. I'll have to add a photo of the final product later. Wish me luck and also wish grandma a happy 81st!

Marshmallow Fondant
(found on http://www.wilton.com/forums/messageview.cfm?catid=7&threadid=77236)

Small batch (about the size of a grapefruit)
1 cup mini marshmallows
1 tbsp water
1 1/2- 1 3/4 cup powder sugar


Large batch 
16 oz bag of mini marshmallows
2 tbsps water
2 lbs powdered sugar (8 cups)


Place marshmallows in a standard 1 cup measuring cup and push down and pack them in. Place in a microwave safe bowl and add the water. Put in the microwave for about 20 seconds. Just long enough for them to soften and puff up. Take out and stir with a spoon until it is combined well. At this point it looks kind of soupy. 


Then add the sugar and mix and fold until all is incorporated and it is no longer sticky. I take it out of the bowl when it gets to the point where most of the sugar is incorporated and I knead it in my hands. If it is too sticky, keep adding more powdered sugar until it is like a dough. This takes roughly about 5-7 minutes. Take a fondant roller or a regular rolling pin and roll out. You can get this fondant almost paper thin and it also repairs well. It's cheap, easy to work with, and tastes great too.

Tuesday, March 2, 2010

Class Time with the Renowned Chef John Kraus

Chef John Kraus of the The French Pastry School in Chicago and one of the top chef's in the U.S. is in Austin for a few days to give demonstrations and classes for the "That Takes the Cake" competition. The Culinary Academy of Austin is allowing Chef Kraus to use our classroom to teach his three-day course on petit fours and our very fortunate class gets to sit in and learn from one of the best. What a rare opportunity!

The timing couldn't be more perfect since our class is right in the middle of learning about petit fours and french pastry. Observing Chef Kraus will definitely help supplement what we've learned and even demonstrate new techniques. We even get to keep the information packet with all of the recipes! He has made several things already, including soleils, raspberry macaroons (top photo), tarts, madeleines topped with a citrus glaze (right photo), earl grey ganache, mocha ganache and tons more.

Sadly, tomorrow will be his last day in our class. He has been a fantastic teacher and it makes me wish I could attend his classes at The French Pastry School. Chef Kraus is incredibly patient, calm, good-humored and incredibly kind for allowing our class to observe free-of-charge (I believe this class costs $800 to attend). I am extremely grateful to have the chance to learn from his expertise, it is truly an experience that will help bolster my culinary knowledge. Thank you Chef Kraus!!!
 

From Fonts to Fondant | Creative Commons Attribution- Noncommercial License | Dandy Dandilion Designed by Simply Fabulous Blogger Templates